Translate

Showing posts with label culinary. Show all posts

Saturday, March 5, 2016

Honeycomb Toffee / Cinder Toffee


Honeycomb Toffee

source: http://www.buzzfeed.com/tasty           
Recipe
2 Cups Sugar
1/2 Cup Light Corn Syrup
1/3 Cup Water
1 Tbsp. Baking Soda

Dark Chocolate
Sea Salt/Maldon Salt

Candy Thermometer

Line a 9 inch baking tray with parchment paper and grease thoroughly.

Set aside a metal whisk and 1 Tbsp. of Baking Soda.

In a LARGE saucepan (bigger the better - as this will more than triple in size) over medium/high heat - combine sugar, corn syrup, and water. Stir to incorporate then leave to boil. Insert candy thermometer and continue to heat - without stirring - until the mixture reaches 300˚F (150˚C). Remove from heat and - working quickly - add the baking soda and quickly whisk into the sugar syrup (whisking for no more than 5 seconds - to prevent deflating the toffee). The mixture will begin to expand, quickly pour it into the prepared pan and leave to set DO NOT MOVE for 1-2 hours.

Once the toffee has cooled and set, remove from pan and using a blunt object, shatter the toffee into bite size pieces.

Melt Chocolate in a microwave safe bowl for 75-90 Seconds - stopping to stir after every 30 seconds. Dip the toffee pieces in chocolate and place on a lined baking tray. Finish with a sprinkle of sea salt and place in the refrigerator to cool for 15 minutes. Enjoy!

Wednesday, March 2, 2016

Jelly Belly Cookie Boxes


Jelly Belly Cookie Boxes

original source and credits:  http://www.glorioustreats.com/2015/03/jelly-belly-cookie-boxes.html


These Jelly Belly Cookie Boxes would be gorgeous favors for any party!
Flowers and jelly beans… two sure signs that spring is here!
Of course these aren’t just any flowers, or just any jelly beans… I created these “sweet” flowers with Jelly Belly jelly beans!
And what’s better than a cookie topped with Jelly Belly beans?  How about cookies topped AND filled with Jelly Belly jelly beans!
These Jelly Belly Cookie Boxes are so colorful and fun, they’d be perfect for Easter, a ladies tea, or any spring celebration!
If you’ve been reading my blog for any length of time, you already know I love making cookie boxes!  I’ve created different designs for most every holiday, and these are my new favorite!  The colorful Spring Jewel mix from Jelly Belly created the perfect inspiration for these spring cookie boxes!
These fun Jelly Belly Cookie Boxes are perfect for spring parties!
Ready to make some pretty cookies?
Let’s get started!
You’ll need…
1.)  A batch of cookies made with my Sugar Cookie Recipe.
2.)  Two circle cookie cutters, one about 3/4″ smaller in diameter than the other.  I used cutters that were 2.5″ and 1.75″ in diameter.   For each finished cookie box you’ll need 4 cookies.  One batch of dough will make about 5 finished cookie boxes using the same dimensions I’ve used.
3.)  A batch of Royal Icing.
4.)  Jelly Belly jelly beans to decorate the tops of the cookie boxes, and fill them.  For the flowers shown, I used Jewel Sour Lemon, Jewel Sour Apple and Jewel Orange Jelly Belly jelly beans.
How to make 3D cookie boxes
Directions –
Bake the cookies – Prepare cookie dough (as directed in the recipe linked above), then cut out circles using your larger circle cutter.  For each finished cookie box you’ll need 4 circle cookies. I used a 2.5″ cookie cutter, but feel free to adjust the size as you wish.  Bake the cookies WHOLE (do not cut out the centers until after the cookies are baked).  As soon as the cookies are baked and you have removed them from the oven (but they are still hot) use the smaller circle to cut into the center of HALF of your cookies.  Cut through the dough with the smaller cutter, but do not touch the cookies (leave the cutout center in place).  Allow the cookies to cool a minute or two on the baking sheet, then use a spatula to carefully move the cookies, with the cutout intact, onto the cooling rack.  Once the cookies have cooled fully, THEN remove the inner circle.  You may need to use the smaller cutter to make sure the inner circle is cut cleanly through.
Once you have each of the piece you need, set them together in sets with one whole cookies as the bottom of the “cookie box”, then add two rings and then you’ll need one whole cookie as the top (pictured below)
How to make 3D cookie boxes
Decorate the cookies – Decorate the cookie tops with royal icing as desired.  I colored my icing light blue.  Outline and then fill in with the blue icing (or a color of your choice), then allow to fully dry, at least 4-8 hours.
While you wait on the icing to dry, prepare the Jelly Belly “flowers”.  I created these same kind of flowers for my Jelly Belly Flower Cake, so hop on over to that post for step by step photos on how to make the flowers and leaves.
Cut the Jelly Belly beans (as show in the Jelly Belly Flower Cake post) and set the candies together on your work surface in the same way you plan to assemble then on the cookies.  For the Jelly Belly flowers I made in the cake post I “glued” the candies together with royal icing so I could quickly assemble the finished cake.  For these cookies, there is no need to glue the flowers together ahead of time.  Simply cut the candies as needed, and set aside.  Once the base icing on the cookies is fully dry, use royal icing to attach each “flower petal” (Jelly Belly halves) directly to the iced cookie.
If desired, after you’ve added the flower and leaves to the cookies, add a simple dotted border (I used white icing) to finish off the look.
I chose a simple and elegant look by creating the same daisy-like flower on each cookie.  Feel free to create flowers in a mixture of colors.

Jelly Belly Flower Cookies

Beautiful Spring Flower Cookie Boxes - with easy to follow step-by-step instructions

Wouldn’t these Jelly Belly Cookie Boxes look amazing as place settings on your Easter table?   They’d be perfect for a garden party, tea party, or any spring celebration!
Be sure to visit Jelly Belly to stock up on these pretty spring jelly beans!
Love Jelly Belly jelly beans?  Here are a couple more beautiful and creative ideas from friends…
Jelly Bean Fudge – from Shugary Sweets
Feather Her Nest Baby Shower, with adorable birds nest cupcakes – from Creative Juice

Disclosure – I was provided product and/or payment in exchange for my work creating this post.  All images, text and opinions are my own.  I only work with brands I use and love.

Sunday, August 9, 2015

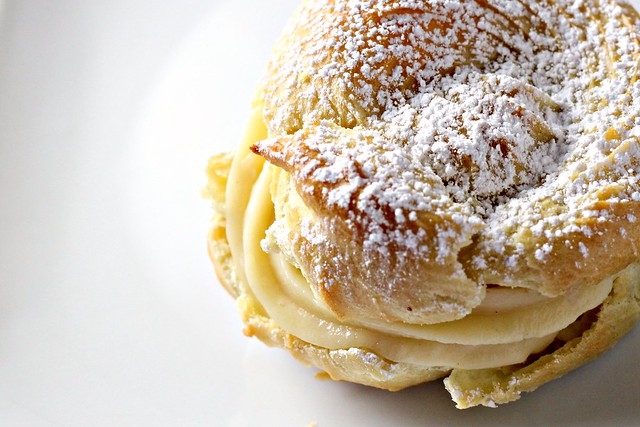
Italian Cream Puffs with Custard Filling - from Joanne

Italian Cream Puffs with Custard Filling (St. Joseph’s Day Pastries)
 
These Italian cream puffs with a rich custard filling are a classic Italian dessert. They are traditionally eaten on St. Joseph's Day, but I say indulge in them year-round!
Yield: 12 large or 24 small pastries
Ingredients
For the pastry
  • 2¾ cups unbleached AP flour
  • ⅛ tsp salt
  • ½ tsp baking soda
  • 2 cups water
  • 9½ tbsp butter
  • 6 large eggs
For the custard
  • 1 cup sugar
  • ½ cup flour
  • ¼ tsp salt
  • 3 cups whole milk
  • 4 egg yolks
  • 3 tbsp unsalted butter
  • 1½ tsp vanilla extract
  • 1 tbsp rum
Instructions
For the pastry
  1. Preheat oven to 425. Line a cookie sheet with parchment paper. Sift the flour, salt, and baking soda together and set aside.
  2. In a heavy saucepan, heat the water. Add the butter. When melted, remove the pan from the stove and add the flour mixture all at once. Beat with a wooden spoon, then return the pan to medium-high heat, beating the mixture until it comes away from the sides of the pan. Remove the pan from the heat and add the eggs one at a time, beating with a wooden spoon or hand mixer in-between additions to mix well.
  3. Fill a pastry bag fitted with a ½-inch tip with the cream puff batter. Squeeze out 3-inch puffs, about ½ inch apart on a cookie sheet. Bake 20 minutes or until golden brown. When done, carefully slit the side of each cream puff with a knife to allow steam to escape and to prevent the puffs from becoming soggy inside. Transfer to cooling racks and let cool.
For the custard
  1. In saucepan over moderate heat, combine sugar, flour and salt. Add milk gradually, cooking and stirring until mixture is thick and bubbly.
  2. Lower heat, stirring for 2 minutes and remove from heat. In a small bowl, add cream mixture to eggs slowly. Return mixture back to pan. Bring to gently boil for 2 more minutes, adding butter, rum, and vanilla. Tranfer to a shallow bowl to cool, placing plastic wrap on the top of the custard to prevent a skin forming. Refrigerate.
  3. Once custard has cooled completely, pipe into opened pastry shells until they are so full they might pop, top with a cherry, and dust with powdered sugar.


Sunday, April 5, 2015

Romanian garlic sauce / Mujdei

This recipe was founded on http://www.romaniangarlic.com


Romanian garlic sauce


5 crushed garlic cloves,
2 olive oil tablespoons,
2 water tablespoons,
100 g of sour cream,
salt to taste.

The water and olive oil will be poured over the crushed garlic cloves and mixed
until they become a homogenous paste and after the sour cream and salt are added
and mixed together.

Mujdei( de usturoi )

5 catei de usturoi zdrobiti
2 linguri ulei de masline / floarea soarelui
2 linguri apa
5 linguri = 100 grame smantana
sare dupa gust

Se curata usturoiul si se zdrobeste. Se amesteca cu uleiul si apa si se zdrobeste
in continuare pana devine o pasta. Se adauga smantana si sare dupa gust si se amesteca.