Translate

Saturday, March 5, 2016

Honeycomb Toffee / Cinder Toffee


Honeycomb Toffee

source: http://www.buzzfeed.com/tasty           
Recipe
2 Cups Sugar
1/2 Cup Light Corn Syrup
1/3 Cup Water
1 Tbsp. Baking Soda

Dark Chocolate
Sea Salt/Maldon Salt

Candy Thermometer

Line a 9 inch baking tray with parchment paper and grease thoroughly.

Set aside a metal whisk and 1 Tbsp. of Baking Soda.

In a LARGE saucepan (bigger the better - as this will more than triple in size) over medium/high heat - combine sugar, corn syrup, and water. Stir to incorporate then leave to boil. Insert candy thermometer and continue to heat - without stirring - until the mixture reaches 300˚F (150˚C). Remove from heat and - working quickly - add the baking soda and quickly whisk into the sugar syrup (whisking for no more than 5 seconds - to prevent deflating the toffee). The mixture will begin to expand, quickly pour it into the prepared pan and leave to set DO NOT MOVE for 1-2 hours.

Once the toffee has cooled and set, remove from pan and using a blunt object, shatter the toffee into bite size pieces.

Melt Chocolate in a microwave safe bowl for 75-90 Seconds - stopping to stir after every 30 seconds. Dip the toffee pieces in chocolate and place on a lined baking tray. Finish with a sprinkle of sea salt and place in the refrigerator to cool for 15 minutes. Enjoy!

Wednesday, March 2, 2016

Jelly Belly Cookie Boxes


Jelly Belly Cookie Boxes

original source and credits:  http://www.glorioustreats.com/2015/03/jelly-belly-cookie-boxes.html


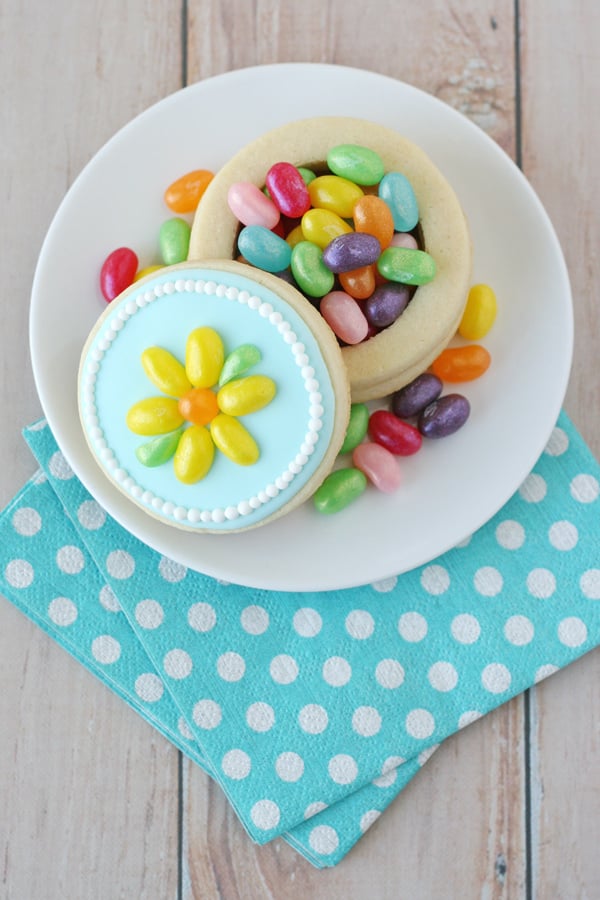
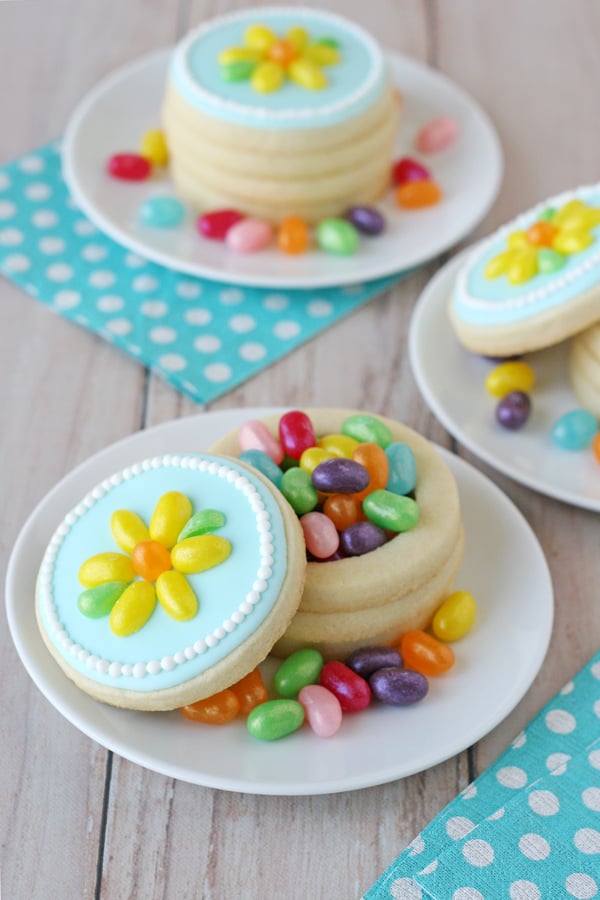
These Jelly Belly Cookie Boxes would be gorgeous favors for any party!
Flowers and jelly beans… two sure signs that spring is here!
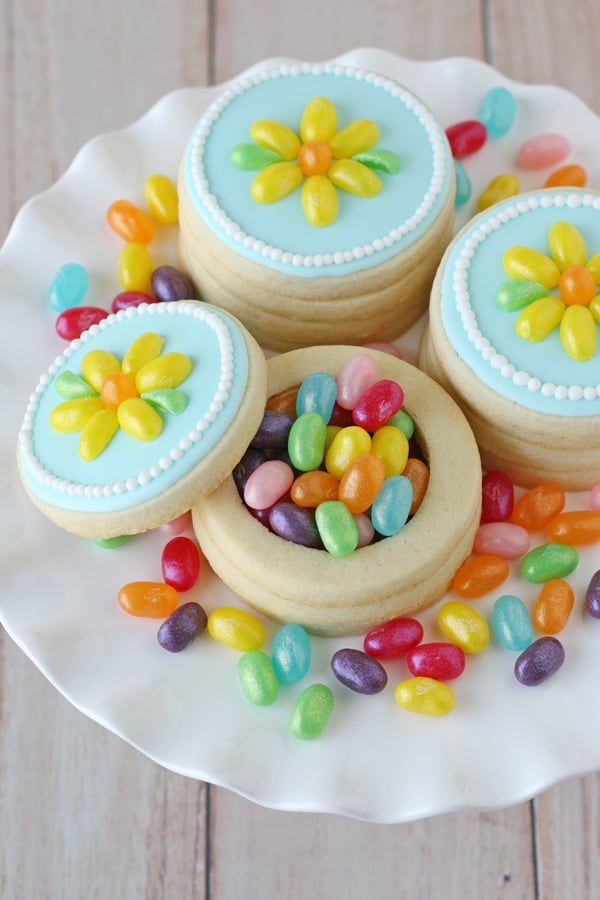
Of course these aren’t just any flowers, or just any jelly beans… I created these “sweet” flowers with Jelly Belly jelly beans!
And what’s better than a cookie topped with Jelly Belly beans?  How about cookies topped AND filled with Jelly Belly jelly beans!
These Jelly Belly Cookie Boxes are so colorful and fun, they’d be perfect for Easter, a ladies tea, or any spring celebration!
If you’ve been reading my blog for any length of time, you already know I love making cookie boxes!  I’ve created different designs for most every holiday, and these are my new favorite!  The colorful Spring Jewel mix from Jelly Belly created the perfect inspiration for these spring cookie boxes!
These fun Jelly Belly Cookie Boxes are perfect for spring parties!
Ready to make some pretty cookies?
Let’s get started!
You’ll need…
1.)  A batch of cookies made with my Sugar Cookie Recipe.
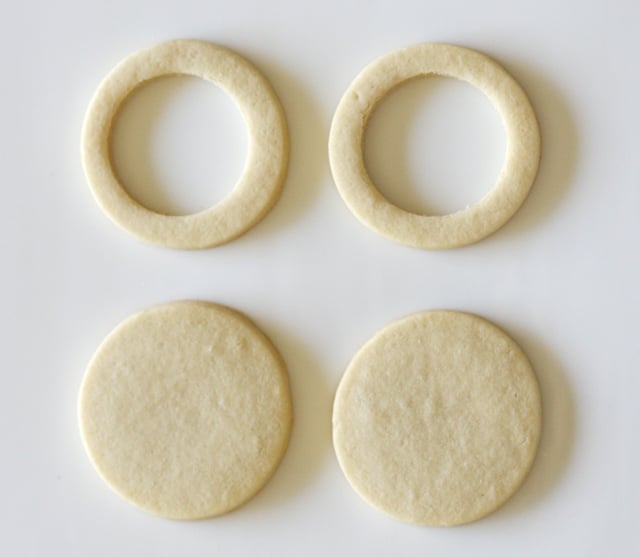
2.)  Two circle cookie cutters, one about 3/4″ smaller in diameter than the other.  I used cutters that were 2.5″ and 1.75″ in diameter.   For each finished cookie box you’ll need 4 cookies.  One batch of dough will make about 5 finished cookie boxes using the same dimensions I’ve used.
3.)  A batch of Royal Icing.
4.)  Jelly Belly jelly beans to decorate the tops of the cookie boxes, and fill them.  For the flowers shown, I used Jewel Sour Lemon, Jewel Sour Apple and Jewel Orange Jelly Belly jelly beans.
How to make 3D cookie boxes
Directions –
Bake the cookies – Prepare cookie dough (as directed in the recipe linked above), then cut out circles using your larger circle cutter.  For each finished cookie box you’ll need 4 circle cookies. I used a 2.5″ cookie cutter, but feel free to adjust the size as you wish.  Bake the cookies WHOLE (do not cut out the centers until after the cookies are baked).  As soon as the cookies are baked and you have removed them from the oven (but they are still hot) use the smaller circle to cut into the center of HALF of your cookies.  Cut through the dough with the smaller cutter, but do not touch the cookies (leave the cutout center in place).  Allow the cookies to cool a minute or two on the baking sheet, then use a spatula to carefully move the cookies, with the cutout intact, onto the cooling rack.  Once the cookies have cooled fully, THEN remove the inner circle.  You may need to use the smaller cutter to make sure the inner circle is cut cleanly through.
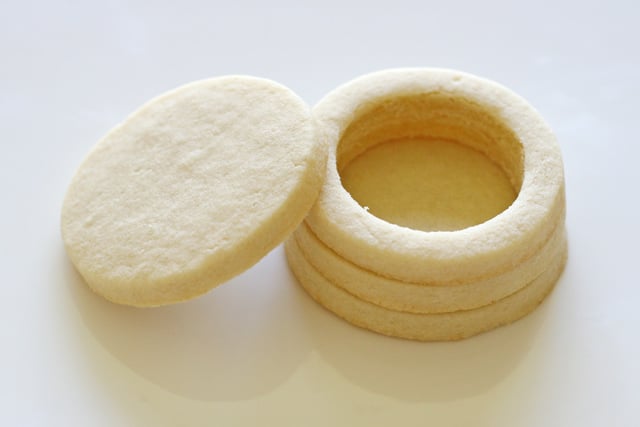
Once you have each of the piece you need, set them together in sets with one whole cookies as the bottom of the “cookie box”, then add two rings and then you’ll need one whole cookie as the top (pictured below)
How to make 3D cookie boxes
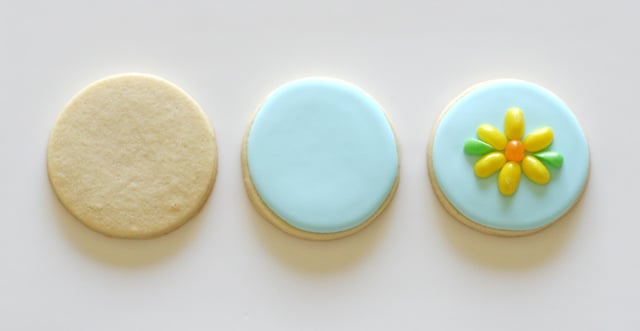
Decorate the cookies – Decorate the cookie tops with royal icing as desired.  I colored my icing light blue.  Outline and then fill in with the blue icing (or a color of your choice), then allow to fully dry, at least 4-8 hours.
While you wait on the icing to dry, prepare the Jelly Belly “flowers”.  I created these same kind of flowers for my Jelly Belly Flower Cake, so hop on over to that post for step by step photos on how to make the flowers and leaves.
Cut the Jelly Belly beans (as show in the Jelly Belly Flower Cake post) and set the candies together on your work surface in the same way you plan to assemble then on the cookies.  For the Jelly Belly flowers I made in the cake post I “glued” the candies together with royal icing so I could quickly assemble the finished cake.  For these cookies, there is no need to glue the flowers together ahead of time.  Simply cut the candies as needed, and set aside.  Once the base icing on the cookies is fully dry, use royal icing to attach each “flower petal” (Jelly Belly halves) directly to the iced cookie.
If desired, after you’ve added the flower and leaves to the cookies, add a simple dotted border (I used white icing) to finish off the look.
I chose a simple and elegant look by creating the same daisy-like flower on each cookie.  Feel free to create flowers in a mixture of colors.

Jelly Belly Flower Cookies

Beautiful Spring Flower Cookie Boxes - with easy to follow step-by-step instructions

Wouldn’t these Jelly Belly Cookie Boxes look amazing as place settings on your Easter table?   They’d be perfect for a garden party, tea party, or any spring celebration!
Be sure to visit Jelly Belly to stock up on these pretty spring jelly beans!
Love Jelly Belly jelly beans?  Here are a couple more beautiful and creative ideas from friends…
Jelly Bean Fudge – from Shugary Sweets
Feather Her Nest Baby Shower, with adorable birds nest cupcakes – from Creative Juice

Disclosure – I was provided product and/or payment in exchange for my work creating this post.  All images, text and opinions are my own.  I only work with brands I use and love.

Friday, February 26, 2016

Lemon Rhubarb Mascarpone Mousse Cake


 source:     delectable deliciousness: Fancy little lemon-rhubarb mousse cakes

Lemon Rhubarb Mascarpone Mousse Cake:

For the tulip paste:
4 ounces unsalted butter, softened
4 ounces powdered sugar, sifted
1/2 cup egg whites, at room temperature
4 ounces all purpose flour, sifted
1 1/2 Tb cocoa powder.

Cream the butter and powdered sugar together in a stand mixer fitted with the paddle attachment. Sift the flour and cocoa powder together and add to the butter mixture and mix until incorporated. Do not overmix. Use right away or store in the refrigerator, taking it out 30 minutes before you plan to use it.
Pour the batter into a piping bag fitted with a small plain tip. Line a baking sheet with parchment paper. Using a ruler set on top of the sheet as your guide, pipe lines with the tulip paste onto the parchment paper, or any shape you desire. You can also smooth a large amount of the paste on the paper and using a ruler set on the rim of the pan, use a decorator comb to drag on the batter to form lines. When I make somewhat straight lines, this is the method I use, and I use the pastry bag method for lace patterns and others. Set the baking sheet in the freezer until the tulip paste is firm. Keep frozen until you are ready to pour the cake batter on top.

For the ribbon sheet cake:
4 ounces finely ground almonds (I used slivered)
3 ounces powdered sugar
1 ounce all purpose flour
4 eggs
1 egg yolk
3 egg whites
1 ounce granulated sugar
1 ounce melted unsalted butter

In the bowl of a stand mixer fitted with the paddle attachment, beat the almonds, powdered sugar, flour and 2 eggs until combined. Scrape the sides and bottom of your bowl with a spatula and add the remaining 2 eggs and the yolk until well combined. Set aside.
Whip the egg whites in a separate bowl until they appear foamy, add the granulated sugar in a steady stream and whip until you get a glossy meringue. Fold the meringue mixture into the egg/flour mixture. Stir in the melted butter and fold until all the ingredients are well incorporated but without deflating your meringue base.

Remove the baking sheet with the tulip paste from the freezer and pour the cake batter on top. Bake at 450F for about 6-8 minutes or until the sponge becomes to color. Remove from the oven, let cool a few minutes and invert your cake onto a piece of parchment paper. Peel the baking paper. Let cool before using. You can keep it wrapped in the refrigerator for up to a week or in the freezer for a month. Bring it back to room temperature before you fit it in the pastry rings. Line 6-8 pastry rings (depending on their size, mine are 3 inches wide) with parchment paper, cut 1.5 inches wide strips of cake and cut them to fit around the inside of your rings. Divide the mousse inside the rings and let set.

For the mousse:
1 egg, separated
2 TB sugar
2 oz mascarpone cheese, at room temperature
75 ml. heavy cream
1 tsp. powdered gelatin (1/2 sheet) + 1 Tb water
zest and juice of one lemon
1 cup cooked rhubarb

Sprinkle the gelatin over the water, stir and let sit to bloom. In a large mixing bowl, whisk the mascarpone with the sugar, add 1 egg yolk and whisk until well incorporated. Heat the gelatin for about 10 seconds in the microwave and quickly whisk it in the mascarpone batter. Add the lemon juice and zest. Whip the egg white until stiff, fold into the mascarpone mixture. Add the cooked rhubarb. Whip the heavy cream to medium stiff peaks, and fold into the mascarpone. Divide it evenly and carefully among the pastry rings. Store in the refrigerator for 2-4 hours or overnight.

Granted it takes a tad longer than a baking brownies but it is just as fun and as good, and if you like playing with shapes, batters and let your imagination run wild, this is a good project to tackle in the kitchen. The end result is so tasty you won't be disappointed!

Saturday, February 20, 2016

Ceafă de porc super fragedă | Tender Steak

Ceafă de porc super fragedă | Tender Steak

Ingrediente: Pentru 8-10 porții de ceafă de porc super fragedă aveți nevoie de:
  • 3 kg ceafă de porc
  • 3-4 căței de usturoi
  • 1 ardei gras roșu
  • 1 pahar vin alb (200 ml)
  • 3-4 fire cimbru proaspăt
  • piper
  • sare
Ceafa de porc super frageda
Această rețetă de ceafă de porc gătită la foc mic în cuptor este cred că cea mai fragedă ceafă de porc pe care am mâncat-o vreodată, iar modul de preparare este foarte simplu, trebuie să aveți doar răbdare să fie gata, pentru că timpul de coacere este destul de mare (1h/per kg de carne).
Condimentarea cefei de porc
Pentru a condimenta ceafa de porc am folosit ingrediente simple și ușor de găsit în orice perioadă a anului. Am folosit un ardei gras pe care l-am spălat și l-am tăiat rondele.
Carnea de porc am spălat-o cu apă rece și am pus-o într-un vas yena încăpător, care are și capac. Dacă nu aveți un astfel de vas puteți folosi o cratiță și un capac termorezistent ce pot fi puse la cuptor.
Peste carnea de porc se pun rondelele de ardei gras și câțiva căței de usturoi curățați și tăiați rondele. Se condimentează cu sare și piper după gust, se adaugă și câteva crenguțe de cimbru… eu am pus cimbru proaspăt pentru că am cimbru ghiveci, însă puteți folosi și câteva rămurele de cimbru uscat.
Se completează friptura cu 1 pahar de vin alb și 1 pahar de apă rece, și se pune la cuptor acoperită cu capacul.
La ceafa de porc nu se pune ulei sau alt tip de grăsime, pentru că este un tip de carne care prezintă zone de grăsime ce se topesc în timpul preparării termice, dând o savoare deosebită mâncării.
Ceafa se ține la cuptor 3-4 ore (aproximativ 1 oră per fiecare kilogram de carne) la aproximativ 160 grade Celsius, și din oră în oră se deschide cuptorul și se mai ia sos cu lingura care se toarnă pe friptură în partea superioară. Cu 30 de minute înainte de final, se scoate capacul și se lasă friptura la cuptor pentru a obține o crustă frumoasă deasupra.
Cum se servește ceafa de porc la cuptor
Ceafa de porc preparată încet la cuptor este deosebit de fragedă, atât de fragedă încât se desprinde fără a fi nevoie să o tăiem cu cuțitul. În ceea ce privește garnitura cu care puteți servi ceafa de porc, puteți alege preparate din cartofi, salate sau murături.

Monday, January 25, 2016

Chocolate Cherry Bombs

Chocolate Cherry Bombs 


Ingredients:
1 Devil’s food chocolate cake mix
½ cup or more prepared dark chocolate frosting
1 jar stem-on Maraschino cherries, drained and dried on paper towels
1 lb good quality dark chocolate
Instructions:
1. Prepare cake mix according to directions (mine was 3 eggs + 1/3 cup oil + 1 cup water), bake 30-35 minutes until it passes the toothpick test.
2. Once it is cool enough to handle, crumble the whole cake into a large mixing bowl.
3. Stir the frosting into the cake crumbles. Add more if needed, until the mixture holds together when you scoop Tablespoonfuls and roll them into balls.
4. Press a cherry into each ball. Enclose the cherry completely with the cake until only the stem pokes out from the middle of the cake ball. Roll around in the palms of your hands again to make sure the ball holds together.
5. Repeat with all the remaining cake balls and Maraschino cherries.
6. Melt the chocolate in a double boiler or in the microwave at 50% power, stirring every 30 seconds and removing when there are still a few pieces of chocolate visible. The residual heat will melt the rest of the chocolate, so keep stirring until it is smooth.
7. Dip the cake balls in the chocolate, using the cherry stem as a handle.
8. Tap against the sides of the bowl to remove excess.
9. Place on parchment or wax paper until dried.
adapted from Hungry Happenings